Unleash the Future: Crafting an AI-Powered Voice Assistant and Chatbot with ReactJS, Alan AI, and ChatGPT 3.5


Step into a world where websites respond to your voice. Imagine having an AI-powered voice assistant on a website that not only introduces you to its content but also carries out tasks and guides you through pages – all by just listening to your voice commands. This innovative approach redefines how we interact with websites, making it an incredibly user-friendly experience.
Picture this: you talk, and the website listens. Need information? Just ask. Want to perform actions? Voice it. Seeking a specific page? Your voice becomes the navigation tool. But it doesn't stop there. Through the integration of ChatGPT, conversations become dynamic and engaging, adding a new layer of interaction that feels remarkably natural.
Our journey takes us into the core of this innovation, where ReactJS, Alan AI, and ChatGPT 3.5 combine their strengths. Together, they create an experience that showcases AI's power and aligns with modern user expectations.
What is AlanAI? 🤔
There are two categories of AI voice assistants: one is general purpose voice assistants and the other is bot voice assistants. Voice assistants like Siri, Alexa belongs to the first category while voice assistants which can be completely customized according to our need like Alan AI falls under the second category.
Alan is a complete end-to-end Voice AI Platform that lets you embed a contextual voice assistant into your existing application UI.
Actionable AI makes it easy to have natural conversations with a smart AI Assistant in your app. It also helps your app understand what you're looking for, connects different information, and gives you personalized results. It's like having a chat with ChatGPT, where the AI learns from how you use it and from your private information. This makes Actionable AI helpful for making things better and more innovative while keeping your experience great.
Table of Contents 📚
Setting Up a Simple Vite React App
Configuring Basic Routing in Your React App
Integrating Alan AI Voice Assistant with Your React App
Creating Your Alan AI Developer Account
Configuring Fundamental Scripts in Alan AI Studio
Setting Up User Events
Configuring Navigation
Outro
Setting Up a Simple Vite React App 🚀
With NPM :
npm create vite
You can also directly specify the project name and the template you want to use via additional command line options
√ Project name: ... React App Alan Ai
√ Package name: ... react-app-alan-ai
√ Select a framework: » React
√ Select a variant: » JavaScript
When Vite completes scaffolding the project, navigate the directory it creates, and install the dependencies via npm.
npm install
To run the project, use this command:
npm run dev
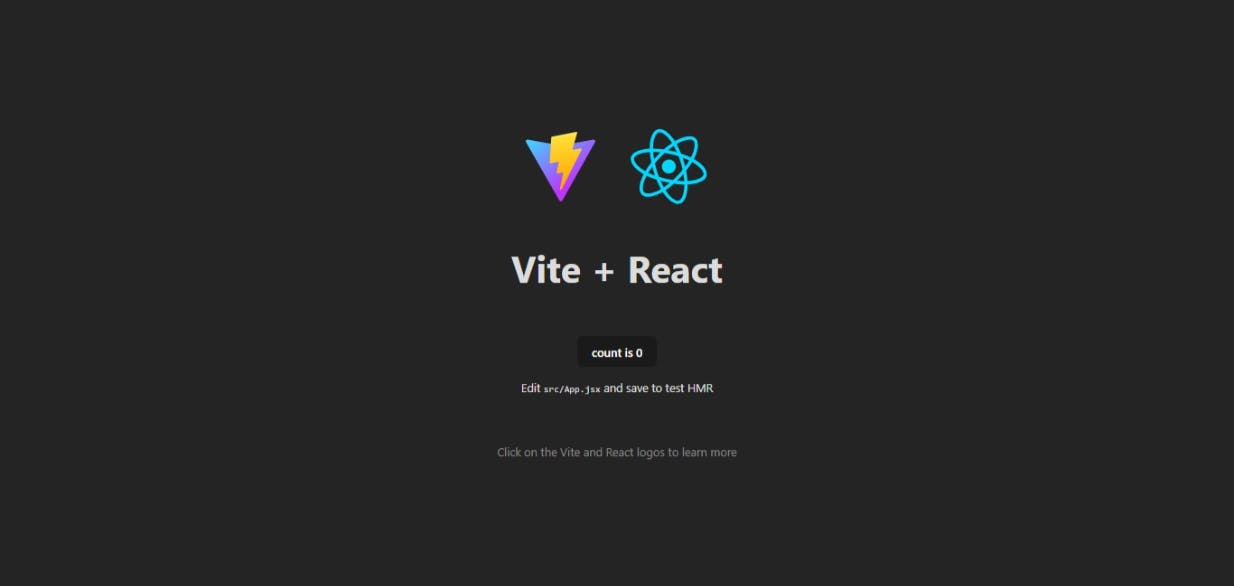
If you can see the screen as shown below, you are good to go!
Reference to Vite Docs Get Started
Configuring Basic Routing in Your React App
How to Install React Router
To install React Router, all you have to do is run npm install react-router-dom@6 in your project terminal and then wait for the installation to complete.
npm install react-router-dom@6
How to Set Up React Router
The first thing to do after installation is complete is to make React Router available anywhere in your app.
To do this, open the main.jsx file in the src folder and import BrowserRouter from react-router-dom and then wrap the root component (the App component) in it.
This is what the main.jsx looked like initially:
import React from 'react'
import ReactDOM from 'react-dom/client'
import App from './App.jsx'
import './index.css'

ReactDOM.createRoot(document.getElementById('root')).render(
  <React.StrictMode>
    <App />
  </React.StrictMode>,
)
After implementing the changes with React Router , here's what your result should look like:
import React from "react";
import ReactDOM from "react-dom/client";
import App from "./App.jsx";
import "./index.css";
import { BrowserRouter } from "react-router-dom";

ReactDOM.createRoot(document.getElementById("root")).render(
  <BrowserRouter>
    <App />
  </BrowserRouter>
);
All we did was replace React.StrictMode with BrowserRouter which was imported from react-router-dom. Now the router features are accessible from any part of your app.
How to Route to Other Components
We are finally done setting things up, so now we'll look at routing to and rendering different components.
Step 1 - Create multiple components
We'll create the following Home, About components like this:
- Home.jsx
import React from "react";

const Home = () => {
  return <div>This is Home Page</div>;
};

export default Home;
- About.jsx
import React from 'react'

const About = () => {
  return (
    <div>
      This is About Us Page
    </div>
  )
}

export default About
Step 2 - Define routes
Since the App.jsx component acts as the root component where our React code gets rendered from initially, we will be creating all our routes in it.
Don't worry if this does not make much sense – you'll understand better after looking at the example below.
After cleaning up the App.jsx components and importing Routes, Route, and the required components, your App.jsx should appear something like this:
import "./App.css";
import { Route, Routes } from "react-router-dom";
import About from "./components/About";
import Home from "./components/Home";
function App() {
  return (
    <>
      <Routes>
        <Route path="/" element={<Home />} />
        <Route path="/about" element={<About />} />
      </Routes>
    </>
  );
}

export default App;
All we have done now is define our routes and their paths and attach them to their respective components.
React Router v6 Click Here
Integrating Alan AI Voice Assistant with Your React App 🗣️🔌
Now, let's add Alan Web SDK to the app. Here, we will be using the NPM package to install the module.
npm install @alan-ai/alan-sdk-web
Next, we'll import alanBtn to the React application. So add this line to your App.js file
import alanBtn from "@alan-ai/alan-sdk-web";
Now, let's add the AlanBtn to the React component in App.js.
import React, { useEffect } from 'react';

useEffect(() => {
  alanBtn({
    key: 'YOUR_KEY_FROM_ALAN_STUDIO_HERE',
    onCommand: (commandData) => {
      if (commandData.command === 'go:back') {
        // Call the client code that will react to the received command
      }
    }
  });
}, []);
Next, let's get your private key from Alan Studio to run the application.
Alan AI Official Docs for ReactJs
Creating Your Alan AI Developer Account 🛠️👩💻
Sign up for Alan Studio from Studio Page with Github Account to Register as a Developer account and get benefits.
Registering through GitHub accounts offers added advantages, by getting more interactions for free.
Once you are authorised you need to create a project by just clicking on the Create Project button.
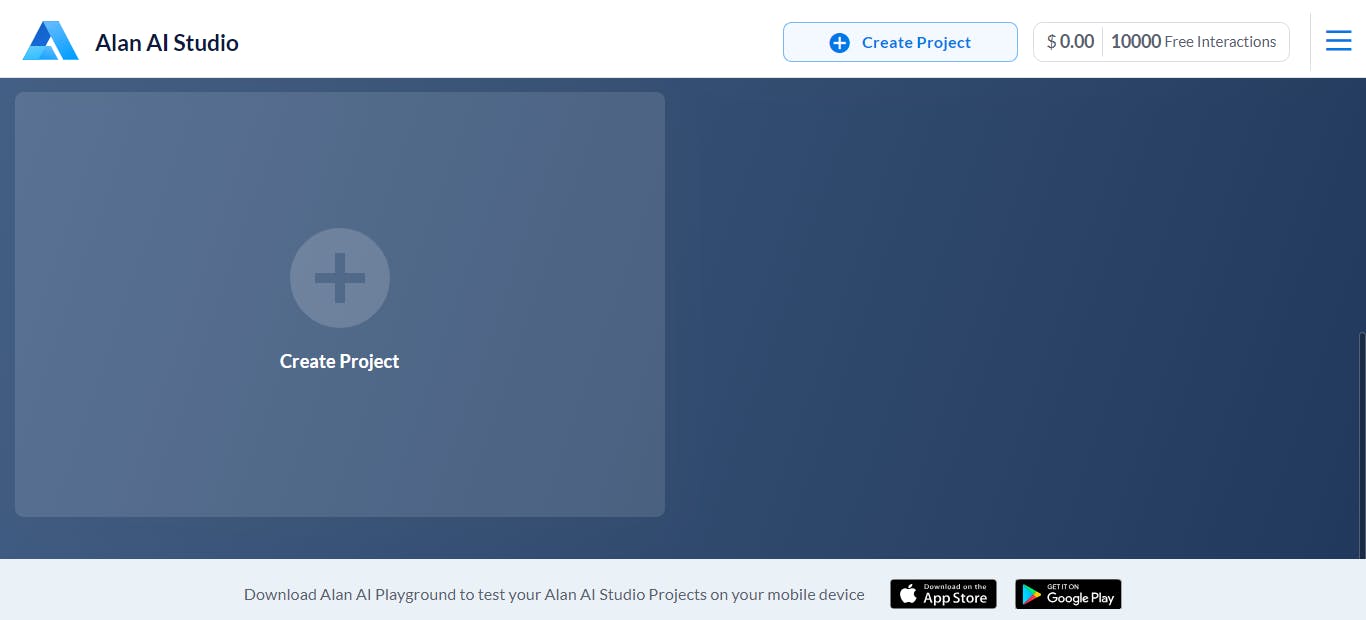
Create an Empty project and name it anything (Example: ReactJs).
Within matter of seconds you have your project ready to work with. On the upper right side of your screen you can find Integrations tab. Click on it to get your key
Once, you get your private key, paste it in the key parameter in your App.jsx. If you see the screen as shown below, you are good to go.

Alan AI Official Docs for ReactJs
Configuring Fundamental Scripts in Alan AI Studio 📝🔧
Let's add some voice commands so that we can interact with our React app through voice. In Alan AI Studio, open the project and, in the code add following intents:
intent(`What is your name?`, p => {
    p.play(`It's Alan, and yours?`);
});

intent(`How are you doing?`, p => {
    p.play(`Good, thank you. What about you?`);
});

intent('Hello world', p => {
    p.play('Hello');
});
Now in the app click the Alan AI button and ask: What is your name? and How are you doing? The AI assistant will give responses provided in the intent.
- You can also pass a list of patterns to the intent function.
const intentPatterns = [
    'What is your favorite food',
    'What food do you like',
];

intent(intentPatterns, p => {
    p.play('CPU time, yammy!');
});
Here's the default Hello_World script for a basic understanding. CLICK HERE to add this script and start experimenting with the code! 😊
Here are Docs
Setting Up User Events 🙋♂️📅
Let's configure Alan AI to introduce the project briefly and provide an introduction when clicked. We'll use the onUserEvent callback, which triggers based on various user actions.
onUserEvent((p, e)=> {
    console.log(e);
    if (e.event === "firstClick") {
        p.play('Hi, this is Alan, your AI assistant! You can talk to me, ask questions and perform tasks with voice or text commands.');
    }
});
Here are related Docs
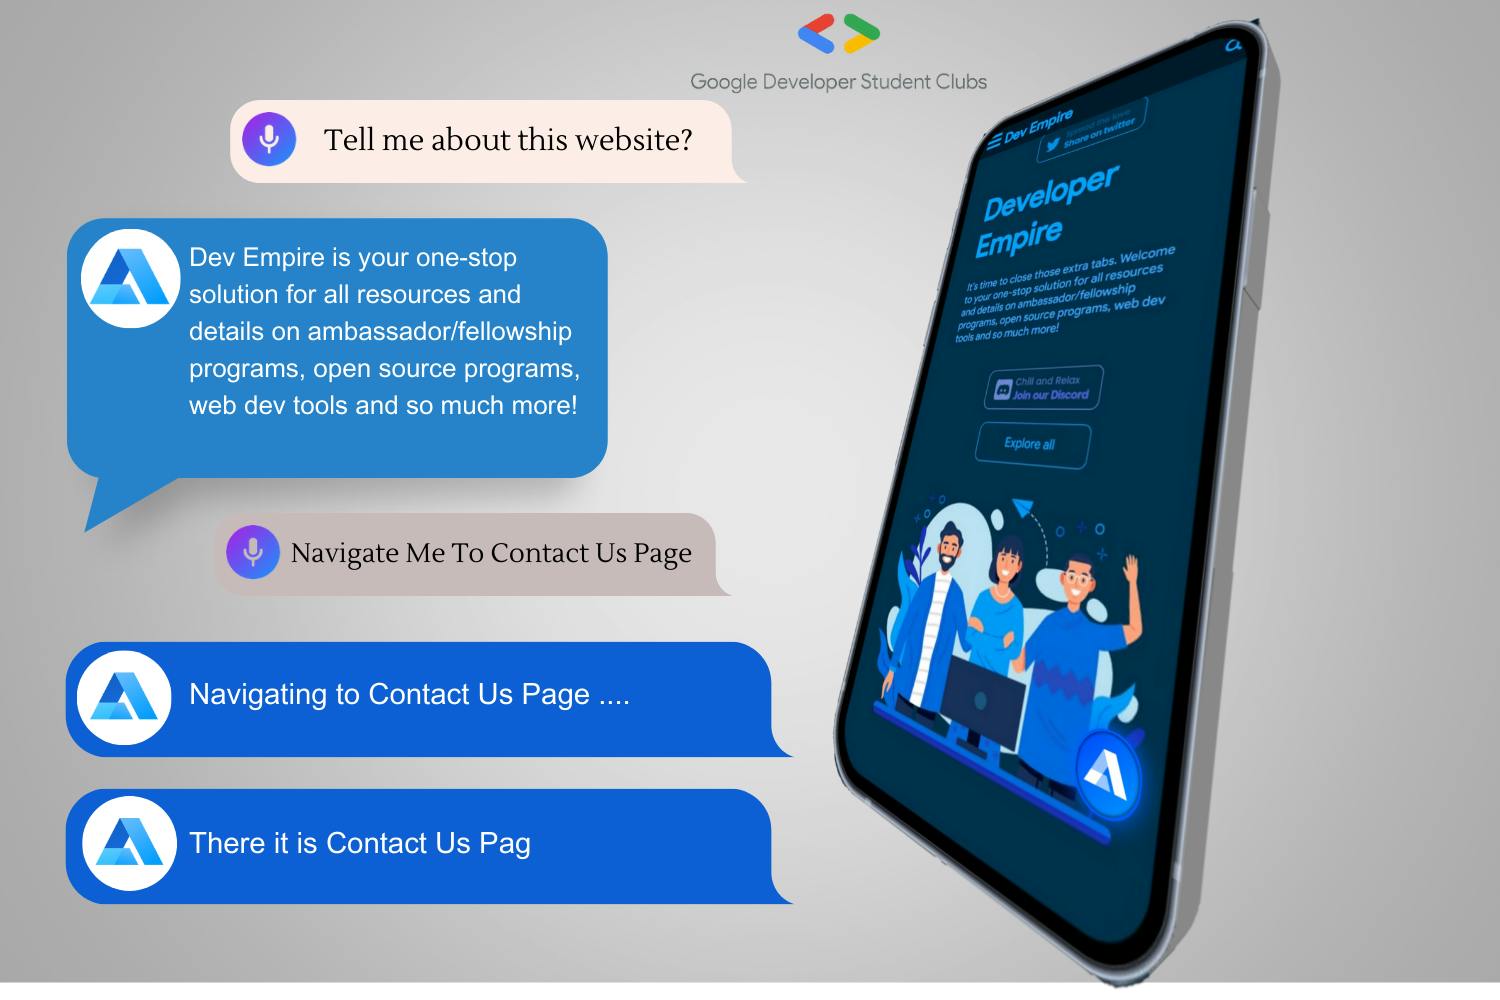
Configuring Navigation 🚀🗺️
The Alan AI Web Chat allows you to streamline website navigation and enable users to access website pages, sections and relevant materials in a single step.
For example, if the user requests information from a specific webpage, the AI assistant can provide a brief response and direct the user to the necessary page, allowing them to obtain all the data they require.
By navigating through the Alan AI Web Chat, users can quickly locate what they want on your website, webpage or web app.
Instead of having a separate intent for each page, we will add a generic intent to navigate to any required section or page on the website.
To the dialog script, add data for all sections and pages you want to open through the Alan AI Web Chat:
 const PAGE_DATA = {
     "Home": {
         "url": "/",
         "variants": ["home", "main", "landing", "front", "starting"],
     },
     "About me": {
         "url": "/about",
         "variants": ["about", "about me", "about you"],
     },
     // add more if needed
 }
You can also use it to easily move around different parts of a website (section) or even go to different websites. For example:
 // For Section
     "Contact": {
         "url": "#mu-contact",
         "variants": ["contact_"],
     },
 //For New Webpage
     "Resume": {
         "url": "assets/pdf/alan-turing-jr-resume.pdf",
         "target": "_blank",
         "variants": ["resume", "CV", "curriculum vitae"],
     }
Add the code to create a list of sections and pages to be used in a slot:
 // Pages and sections list
 let arrPageAliases = [];
 for (const [page, pageData] of Object.entries(PAGE_DATA)) {
     for (const variant of pageData.variants) {
         arrPageAliases.push(variant + '~' + page);
     }
 }

 project.websitePages = arrPageAliases.join('|');
 console.log(project.websitePages);
Add a generic intent that uses the created list of sections and pages in a slot:
 // Generic navigation intent
 intent(
     "(Open|Show|Display|View|Go to|Navigate to) (a|the|) $(p:websitePages) (page|screen|section|)",
     "$(p:websitePages) (page|screen|section)",
     p => {
         let page = p.websitePages.label;
         if (PAGE_DATA[page].target) {
             p.play({command: "openURL", url: PAGE_DATA[page].url, target: PAGE_DATA[page].target}, opts({force:true}));
         } else {
             p.play({command: "openURL", url: PAGE_DATA[page].url}, opts({force:true}));
         }
         p.play(
             `(Here you go|There it is|No problem). The ${page} page.`,
             `(Opening|Navigating to) the ${page} page`
         );
     }
 );
Finally, we will handle the
openURLcommand sent from the dialog script in the webpage.- To the webpage, add the code for the
onCommandhandler:
- To the webpage, add the code for the
     onCommand: function (commandData) {
          if (commandData && commandData.command === 'openURL') {
            if (commandData.target === '_blank'){
              window.open(commandData.url,'_newtab' + Math.floor(Math.random()*999999));
            } else {
              window.location.href = commandData.url;
            }
          }
        },
        rootEl: document.getElementById("alan-btn"),
After Updating the useEffect should look like this
     useEffect(() => {
        alanBtnRef.btnInstance = alanBtn({
         key: 'YOUR_KEY_FROM_ALAN_STUDIO_HERE',
          onCommand: function (commandData) {
            if (commandData && commandData.command === "openURL") {
              if (commandData.target === "_blank") {
                window.open(
                  commandData.url,
                  "_newtab" + Math.floor(Math.random() * 999999)
                );
              } else {
                window.location.href = commandData.url;
              }
            }
          },
          rootEl: document.getElementById("alan-btn"),
        });
      }, []);
You can now test how navigation through the Alan AI voice assistant. On the webpage, click the Alan AI assistant button and try the following commands:
Go to Home
Open About
Here are related Docs
Outro 🎉
The world of voice assistants is a big and fascinating topic. Players like Alan have helped users get on board quickly and with ease. It offers wholesome features with the power to make an impact. There’s no better way to test-drive Alan than by diving in and playing with it.
The purpose of the blog is to create awareness about Voice assistants and build a community of React developers who can integrate voice assistants into their applications. To learn further I would recommend you to go through Alan AI's official Documentation.
References and Links
Demo Projects on Github -
Comming Soon
Connect Me :
And that's a wrap! 🎉 This content was crafted by Vinayak Vispute. Feel free to reach out and connect with me anytime! 📧🤝